
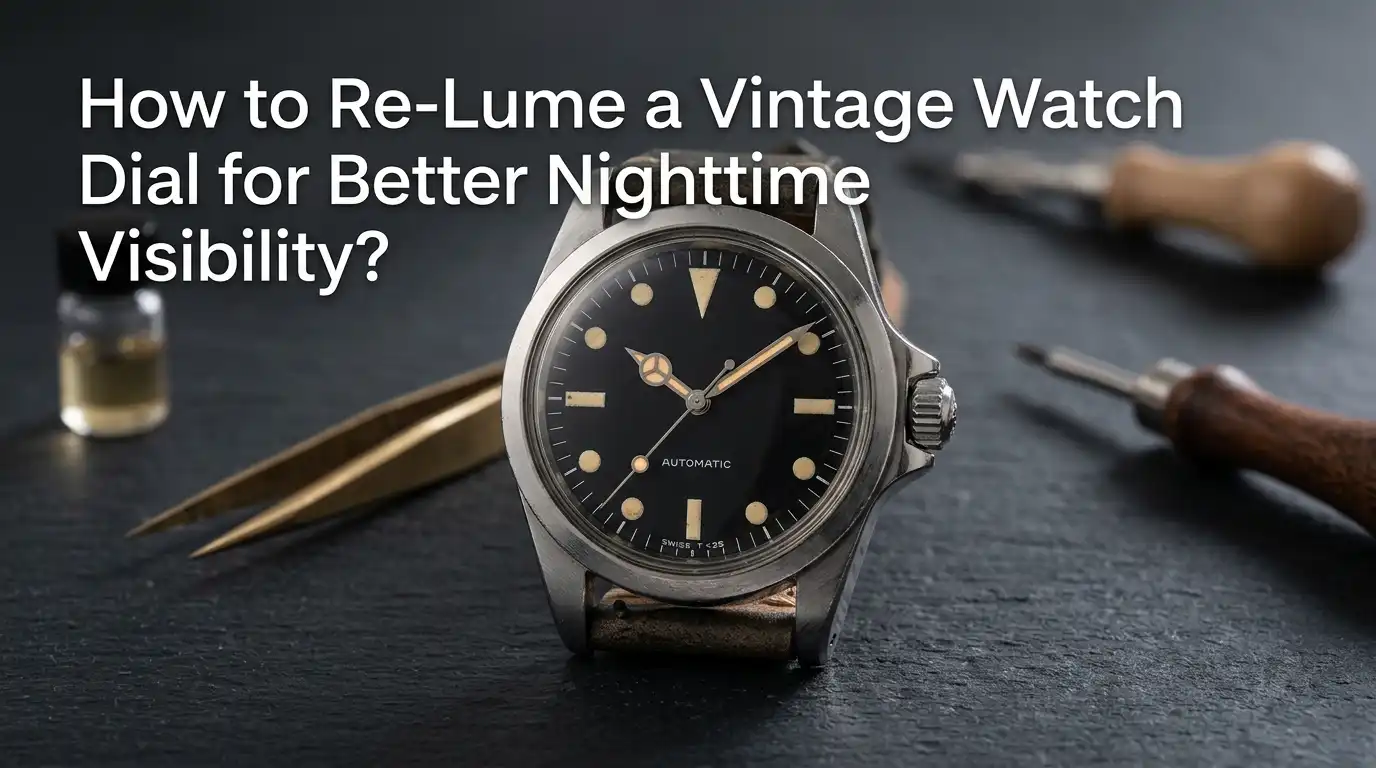
How to Re-Lume a Vintage Watch Dial for Better Nighttime Visibility?
Old watches carry stories on their wrists. Yet the glowing paint on their dials often fades after decades of use.
You might love the look of your grandfather’s vintage timepiece, but checking the time at night becomes a frustrating squint. The faded lume turns dull, cracked, or even crumbles away.
The good news is that you can bring that nighttime glow back to life. Reluming a vintage watch dial is a skill that rewards patience and steady hands. With the right tools, safe practices, and proper materials, you can restore both function and charm.
In a Nutshell
- Safety comes first. Vintage dials made before 1960 may contain radium, which is radioactive. Always wear gloves, a mask, and work in a ventilated area. Never blow on the dial or touch your face during the process.
- Choose the right lume material. Modern Super-LumiNova is the safest and brightest option for hobbyists. It glows for hours after charging with light and contains no radioactive elements.
- Mix lume powder with the correct binder. A typical ratio is 1:1 powder to binder by volume, but this can be adjusted for thicker or thinner application. Practice on scrap paper first.
- Use proper tools. A fine oiler, sharp toothpick, or 0000 brush works best for placing tiny dots of lume. A magnifying loupe or microscope helps you see your work clearly.
- Match color to age. Pick a cream, vanilla, or aged tone if you want the relume to look original. Bright white lume on a 1950s dial will look out of place.
- Practice on hands first. Watch hands are easier to relume than dials. Build your confidence on cheap parts before working on your prized vintage piece.
Why Vintage Watch Lume Fades Over Time
Old lume material breaks down for many reasons. Radium and tritium, the two main glowing compounds used in older watches, lose their light over decades.
Radium burns out the phosphor crystals it sits in, even though the radium itself stays radioactive. Tritium has a half life of about twelve years, so a watch from the 1970s glows very weakly today.
Moisture and air also damage lume paint. The binder that holds the powder together cracks and yellows. Sometimes the lume falls out of the indices completely.
Heat, sunlight, and rough handling speed up the damage. By the time you inherit or buy a vintage watch, the lume may be little more than a brown crust. Reluming restores both function and visual balance to the dial.
Understanding Different Lume Types Used Through History
Watch makers have used three main lume materials over the past century. Knowing which one sits on your dial helps you handle it safely. Radium paint ruled from about 1910 to the early 1960s. It glows on its own thanks to radioactive decay, but it carries real health risks.
Tritium replaced radium from the 1960s through the late 1990s. It is much weaker in radiation and was painted directly on dials. Watches with tritium often show “T SWISS T” or “T < 25” markings near the six o’clock position.
Super-LumiNova and similar photoluminescent compounds took over in 1998. These are completely non radioactive and need light to charge. Most modern relumes use Super-LumiNova or LumiBrite for safety and brightness.
Safety First: Handling Radium and Tritium Dials
Before you touch any pre 1960s dial, take serious precautions. Radium dust is dangerous if inhaled or swallowed. Even a tiny particle stuck in your lung can cause long term damage. Always wear nitrile gloves, a respirator rated for fine particles, and safety glasses. Work over a damp paper towel to catch any flakes.
Never sand or scrape dry radium lume. Keep it wet with isopropyl alcohol while you remove it. Dispose of the contaminated paper towels, gloves, and tools in a sealed plastic bag. Some local hazardous waste centers accept radium materials.
Tritium is far less risky, but you should still wear gloves and a mask. Wash your hands and work surface thoroughly when finished. If you feel unsure about handling radium, send the dial to a professional restorer.
Pros of strict safety practices: You protect your health and your home from contamination.
Cons: The setup takes time and adds cost for protective gear.
Tools You Need for a Successful Relume Project
Gathering the right tools before you start saves frustration. You will need a bottle of Super-LumiNova powder in your chosen color, a binder solution, and a thinner. A small mixing dish, a glass stirring rod, and fine application tools are also necessary.
For application, fine oiler needles in different sizes work better than brushes for most dial work. A 4x to 10x loupe lets you see what you are doing. A pegwood stick, sharpened to a fine point, helps remove old lume without scratching the dial. You will also want lint free cloths, isopropyl alcohol for cleaning, and a soft watchmaker’s brush.
A bright daylight lamp matters more than people think. Good lighting helps you judge color, thickness, and placement. Add a UV flashlight to test the glow as you work.
Choosing the Right Lume Color and Brightness
Picking the right shade keeps your relume looking authentic. Super-LumiNova comes in many color grades. C1 is bright white, C3 is a slight greenish yellow with the strongest glow, and BGW9 glows blue at night while looking white in daylight. Aged tones like Old Radium or Vintage mimic the cream and tan colors of decades old lume.
For a 1940s or 1950s watch, choose a vintage cream or pumpkin shade. Modern white lume on an old patinated dial creates an awkward mismatch. If your dial has yellowed indices and brown patina, match the warmth of those tones.
Pros of vintage color tones: They blend with original patina and preserve the watch’s character.
Cons: They glow less brightly than C3 or BGW9, so nighttime visibility is lower. You must decide between authenticity and maximum brightness.
Step One: Removing Old Lume Carefully
Place the dial face up on a clean, soft surface. Wear gloves and a mask if there is any chance of radium. Wet the old lume with a drop of isopropyl alcohol to keep dust down. Use a sharpened pegwood stick to gently lift the old material from each index or numeral.
Work slowly and never push hard against the dial surface. Vintage dial paint is fragile and chips easily. If the lume sits inside metal cups or recessed areas, scoop it out with a fine oiler tip. For stubborn deposits, soak a cotton swab in alcohol and dab gently.
When the recesses are empty, brush them clean with a soft brush. Inspect under your loupe to make sure no debris remains. Any bumps or leftover bits will show through your fresh lume application.
Step Two: Mixing Your Lume Compound
Pour a small amount of Super-LumiNova powder into your mixing dish. Add the binder slowly using a clean dropper. The standard ratio is one part powder to one part binder by volume, though you can adjust based on how thick you want the mixture.
A thicker mix gives more dome and brightness but is harder to apply. A thinner mix flows better but may need several coats. Stir gently with a glass rod until the texture looks like soft toothpaste with no dry lumps. Avoid trapping air bubbles, since these create pinholes when the lume dries.
Mix only what you can use within fifteen minutes. The binder starts curing as soon as it meets air. Cover unused powder tightly to keep moisture and dust out.
Step Three: Applying Lume to Hour Markers
Dip the tip of a fine oiler into your mixed lume. Pick up a small bead and carefully place it onto the first hour marker. Let surface tension pull the lume into the recess. Do not press down or smear.
Work from twelve o’clock around the dial in order. Try to use the same amount of lume on each marker so they all look uniform. A magnifier helps you judge the size of each dot. If you place too much, gently lift some off with a clean oiler before it dries.
Let each application set for a few seconds before moving to the next index. Patience here pays off in a clean, professional looking result. Once all markers are done, set the dial aside in a dust free area to cure for at least twenty four hours.
Pros of dot by dot application: Clean edges and uniform appearance.
Cons: Slow process that requires steady hands and good eyes.
Step Four: Reluming the Watch Hands
Watch hands often have hollow recesses or open frames that hold lume. Lay each hand flat on a piece of double sided tape so it cannot move. Clean any old lume out the same way you cleaned the dial markers.
For open frame hands, place the hand over a smooth surface like glass or a silicone mat. Apply the lume so it fills the frame from underneath. Use a slightly thicker mix for hands than for the dial, since the lume needs to bridge an open space.
Let the hands cure flat for a full day before installing them. Test the glow with a UV light or sunlight. If the hands look uneven, you can scrape off the lume and try again. Hand lume often takes practice to perfect.
Step Five: Curing and Finishing the Dial
After application, your dial needs time to cure properly. Place it in a clean, enclosed container like a small plastic box. Dust is the enemy of fresh lume and will stick to the wet surface easily. Most binders cure fully within twenty four to forty eight hours.
Avoid moving or touching the dial during curing. Some restorers leave the dial in a low humidity environment to help the binder set evenly. Once cured, the lume should feel hard and look slightly domed above each marker.
Inspect the finished dial under bright light and then under UV. Look for evenness, color match, and brightness. If you spot small flaws, you can sometimes touch them up with a tiny amount of fresh lume. Major errors require removing that section and starting over.
Common Mistakes to Avoid During Reluming
Many first timers rush the process and pay the price. Mixing too much lume at once leads to wasted material as the binder hardens. Using a brush instead of an oiler often creates messy, uneven blobs that look amateur.
Skipping the cleaning step is another common error. Old lume residue prevents new lume from sticking properly. The fresh application may flake off within months. Touching the dial face with bare fingers leaves oils that ruin paint and create smudges.
Working in poor light leads to misplaced dots and uneven amounts. Choosing the wrong color makes your relume look fake against the aged dial. Finally, applying lume too thickly causes it to overflow the recesses and look sloppy. Take your time, plan each step, and check your work often.
When to Call a Professional Restorer
Some projects are beyond a hobbyist’s reach. Rare vintage watches lose value fast if reluming is done poorly. If your watch is a sought after model from a top brand, professional restoration is the safer choice. Specialists have the skills and tools to match original lume colors exactly.
Heavily damaged or radium contaminated dials also belong with professionals. They have proper ventilation, disposal procedures, and protective equipment. Some restorers can even apply lume that mimics specific decade signatures.
Professional reluming usually costs between one hundred and four hundred dollars depending on complexity. This is a small price to pay for protecting a valuable watch. If you plan to sell the watch later, a professional relume may preserve more value than a DIY job. Always ask for before and after photos and references before sending your dial out.
Frequently Asked Questions
How long does a relume last on a vintage watch?
A properly applied Super-LumiNova relume can last twenty years or more. The pigment itself does not break down like radium or tritium did. The binder may yellow slightly over many decades, but the glow stays strong. Keep the watch away from extreme heat and moisture for best results.
Will reluming reduce the value of my vintage watch?
It depends on the watch and the quality of work. For collector grade pieces, original lume is highly prized even when faded. Reluming can lower value by twenty to fifty percent in some cases. For everyday vintage watches, a clean relume often improves appeal and usability.
Can I relume a watch dial without removing the dial from the movement?
It is possible but risky. Loose lume particles can fall into the movement and cause damage. Most experts recommend removing the dial first for safe and clean work. If you must work with the dial in place, cover the movement with plastic film and work very carefully.
How bright will my relumed dial glow at night?
Modern Super-LumiNova C3 glows for six to eight hours after a full charge. BGW9 glows slightly less long but with a cleaner blue tone. Aged or vintage colored lume glows for less time, usually two to four hours. Charge your watch under sunlight or a bright lamp for the strongest glow.
Is it safe to wear a vintage radium watch every day?
Wearing a sealed radium watch is generally low risk because the case blocks alpha particles. The danger comes from opening the case or breathing radium dust. If the crystal is cracked or the dial is flaking, stop wearing the watch and have it professionally serviced or relumed.

Hi, I’m Lucy Jones, a dedicated watch enthusiast and reviewer. I spend my time hunting down, testing, and evaluating the most intriguing wristwatches on the market. My goal is to guide you through the overwhelming choices with honest, hands-on insights into every timepiece.