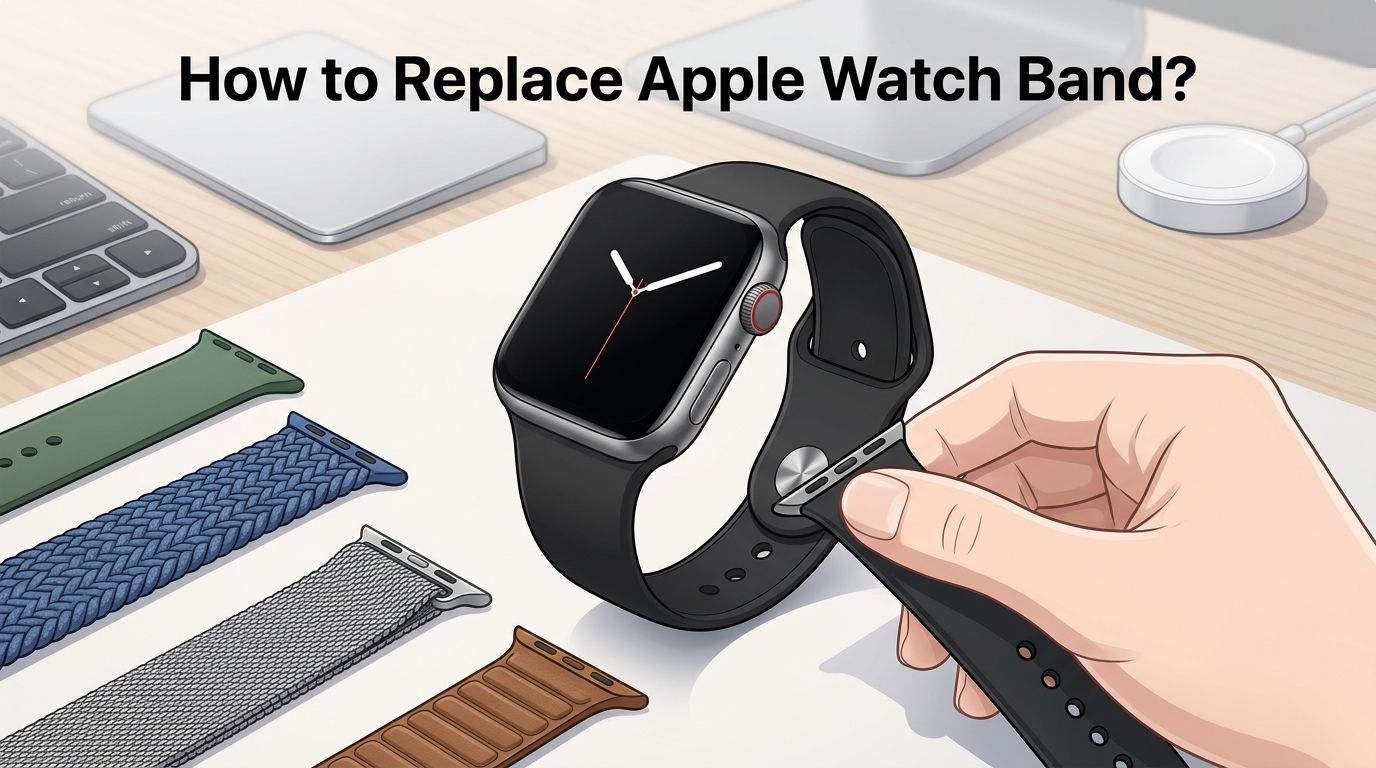
How to Replace Apple Watch Band? Step by Step Guide
Your Apple Watch band is looking worn out. Maybe the color no longer matches your style. Or perhaps you just want a fresh look for a new season.
Whatever the reason, replacing your Apple Watch band is one of the easiest upgrades you can make. The process takes less than 30 seconds once you know the right steps.
But here is the catch. Many people press the wrong button, slide the band in the wrong direction, or buy a band that does not fit their model. Some even end up with a band that gets stuck and refuses to come out.
Key Takeaways
- The band release button is on the back of the Apple Watch. You need to press and hold this small oval button while sliding the band sideways to remove it. The button is located where the band meets the watch case. Do not pull the band upward or downward.
- Apple Watch bands are cross compatible within size groups. Bands for 38mm, 40mm, and 41mm cases all work with each other. Bands for 42mm, 44mm, 45mm, 46mm, and 49mm cases are also interchangeable. This means you do not need a band made for your exact model.
- You should always place your watch face down on a soft surface before removing the band. This protects the display from scratches and gives you a clear view of the release button. A microfiber cloth or soft towel works perfectly.
- A stuck band is usually caused by dirt or debris in the band slot. Isopropyl alcohol applied with a cotton swab can loosen the release button. Gently rocking the band side to side while pressing the button also helps.
- Solo Loop and Braided Solo Loop bands require accurate wrist measurement. These bands have no clasp or buckle. If you pick the wrong size, the band will be too tight or too loose. Use Apple’s printable sizing guide before you buy.
- Third party bands work the same way as official Apple bands. The attachment method is identical. Just make sure the third party band matches your watch case size group for a proper fit.
Understanding the Apple Watch Band Release System
The Apple Watch uses a simple slide and click band system. Each band has a small connector bar that slides into a slot on the top or bottom of the watch case. A spring loaded release button on the back of the watch holds the band in place.
This system is the same across every Apple Watch model from Series 1 through the latest release. Apple designed the mechanism so you can swap bands quickly without tools. The release button is a small oval shape located on the underside of the watch, right where the band meets the case.
You will find two release buttons on your Apple Watch, one for each side of the band. Each side of the band slides out independently. This means you can replace just one half if needed, which is useful for two piece bands like the Sport Band.
How to Remove Your Current Apple Watch Band
Start by placing your Apple Watch face down on a clean, soft surface. A microfiber cloth or folded towel protects the screen from scratches. Make sure you can clearly see the back of the watch.
Locate the band release button on the underside of the watch. Press and hold this button firmly. While holding the button, slide the band horizontally across the watch to remove it. The band should glide out smoothly in one direction.
Repeat this process for the other side of the band. Do not pull the band away from the watch at an angle. The band only moves left or right along the slot. If it feels stuck, release the button and try pressing it again before sliding.
Pros of this method: No tools required, takes under 15 seconds, works on all Apple Watch models.
Cons of this method: The release button can be hard to press with larger fingers, and dirt buildup may cause the button to stick over time.
How to Attach a New Apple Watch Band
Hold your new band with the text or markings facing you and the connector bar pointing at the band slot. Most bands have small text printed near the connector that indicates the correct orientation.
Slide the band into the slot from one side. You will hear a small click when the band locks into place. Gently tug the band to confirm it is secure. If there is no click, pull the band out and try again.
Repeat this step for the second piece of the band on the opposite side. Always check both sides before wearing the watch. A band that is not fully clicked in can detach during activity and cause your watch to fall.
Pros: Quick and easy, no special skills needed.
Cons: Some third party bands may require extra pressure to click in properly.
Apple Watch Band Compatibility by Size
Apple Watch bands fall into two main size groups. The small group includes cases sized 38mm, 40mm, and 41mm. The large group includes cases sized 42mm, 44mm, 45mm, 46mm, and 49mm.
Any band from the small group fits any watch in the small group. The same applies to the large group. For example, a 42mm band from an older Series 3 will fit a 45mm Series 9. Apple Watch Ultra bands at 49mm also fit 44mm, 45mm, and 46mm cases.
This cross compatibility means you have a huge selection of bands available for your watch. You do not need to search for a band that matches your exact case size. Just identify which size group your watch belongs to and shop within that group.
Choosing the Right Band Material for Your Needs
Apple offers several band materials and each one serves a different purpose. The Sport Band is made from fluoroelastomer, a smooth silicone material that resists sweat and water. It is the most popular choice for workouts.
The Sport Loop uses a woven nylon fabric with a hook and loop fastener. It is lightweight, breathable, and adjusts quickly. The Braided Solo Loop is made from recycled yarn woven with silicone threads. It stretches over your hand and has no clasp at all.
Metal bands like the Milanese Loop and Link Bracelet offer a more formal look. Leather bands provide a classic style but require more care. Each material has trade offs in comfort, durability, and appearance.
Pros of silicone bands: Waterproof, affordable, easy to clean.
Cons of silicone bands: Can trap moisture underneath, may irritate sensitive skin during long wear.
Pros of fabric and woven bands: Breathable, comfortable, lightweight.
Cons of fabric and woven bands: Absorb sweat and odor over time, require regular washing.
How to Measure Your Wrist for Solo Loop Bands
Solo Loop and Braided Solo Loop bands do not have a clasp or buckle. They stretch over your hand and sit snugly on your wrist. Getting the right size is critical because there is no way to adjust the fit after purchase.
Apple provides a printable sizing tool on their website. Print it at 100% scale, cut out the guide, and wrap it around your wrist just above the wrist bone. Note the number where the end of the strip meets the guide. This number corresponds to your band size.
Measure your wrist at the end of the day when your wrist is slightly larger. If you fall between two sizes, choose the smaller size because the band stretches slightly over time. Avoid measuring right after exercise when your wrist may be temporarily swollen.
Fixing a Stuck Apple Watch Band
A stuck Apple Watch band is a common problem caused by dirt, sweat residue, or debris trapped in the band slot. The release button may feel stiff or fail to press down fully. Do not use force to yank the band out, as this can damage the connector.
Apply a small amount of isopropyl alcohol to a cotton swab. Dab the alcohol around the release button and the edges of the band slot. Let it sit for about five minutes. The alcohol dissolves grime without harming the watch.
Press the release button and gently rock the band back and forth while sliding it sideways. Repeat this motion several times. If the band still will not move, try pressing the button at a slight downward angle. In extreme cases, visit an Apple Store for professional assistance.
Pros of the alcohol method: Inexpensive, effective for most stuck bands, safe for the watch.
Cons of the alcohol method: May need multiple attempts, does not work if the connector is physically damaged.
How to Replace Bands on Apple Watch Ultra
The Apple Watch Ultra uses the same band release mechanism as standard Apple Watch models. The process for removing and attaching bands is identical. Press the release button and slide the band out horizontally.
However, the Ultra has a 49mm case and is designed for larger, more rugged bands. Bands like the Trail Loop, Alpine Loop, and Ocean Band are built specifically for outdoor and extreme sport use. These bands also fit 44mm, 45mm, and 46mm cases.
The Ultra’s band slots have the same connector size as the large group. This means you can use any standard large group band on your Ultra. The fit will look slightly different because the Ultra case is wider, but the connection is secure and fully functional.
Caring for Your Apple Watch Band After Replacement
Your new band will last longer with basic routine care. Rinse silicone and Sport Loop bands under clean water after workouts. Pat them dry with a lint free cloth. This removes sweat and salt that can cause discoloration.
For fabric and woven bands, wipe them with a damp cloth weekly. Avoid submerging leather bands in water. Instead, use a dry or slightly damp cloth and apply leather conditioner every few months to prevent cracking.
Store unused bands in a cool, dry place away from direct sunlight. Extended sun exposure fades colors and weakens certain materials. If you rotate between multiple bands, keep them organized in a band storage case or soft pouch.
Common Mistakes to Avoid During Band Replacement
The most frequent mistake is pulling the band away from the watch instead of sliding it sideways. The band connector only moves in one horizontal direction. Pulling upward or outward can bend the connector and damage the slot.
Another common error is forgetting to press the release button fully. A half press will not disengage the locking mechanism. Use the pad of your finger and press firmly until you feel the button depress completely.
Some users also insert the new band upside down or backwards. Most bands have small printed text near the connector that indicates the correct orientation. If the band does not click in smoothly, flip it around and try the other direction. Never force a band into the slot.
When to Replace Your Apple Watch Band
Replace your band when you notice visible signs of wear like cracking, peeling, fraying, or permanent discoloration. A worn band can break during daily use and cause your watch to fall off your wrist.
You should also replace the band if the connector feels loose or the band no longer clicks securely into place. A wobbly connection means the locking mechanism inside the connector bar is worn out. This is more common with third party bands that use lower quality materials.
Consider replacing your band for comfort reasons too. If your skin feels irritated, red, or itchy under the band, switch to a different material. Silicone can cause contact irritation for some people. A woven nylon or fabric band often solves this problem.
Third Party Bands vs Official Apple Bands
Official Apple bands use premium materials and go through strict quality testing. They fit perfectly every time, and the connector bars are made from durable stainless steel. Apple also offers the widest variety of colors and seasonal limited editions.
Third party bands cost significantly less and come in thousands of designs, patterns, and styles. Many third party brands produce bands that feel nearly identical to official ones. The attachment system is the same, so they slide in and click just like an Apple band.
Pros of official Apple bands: Perfect fit, high quality materials, warranty coverage, consistent connector durability.
Cons of official Apple bands: Higher price, limited designs compared to the broader market.
Pros of third party bands: Affordable, wide variety, creative designs, easy to find.
Cons of third party bands: Inconsistent quality, connectors may wear out faster, some may not click securely.
Troubleshooting Band Replacement Issues
If your new band does not click into place, check that the connector bar is aligned with the slot. The bar must enter the slot perfectly straight. Even a small angle can prevent the locking mechanism from engaging.
If you hear a click but the band feels wobbly, remove the band and inspect the connector for damage. Look for bent metal, cracks, or debris on the connector bar. A damaged connector will never lock securely and the band should be replaced.
For users who experience frequent band release during wear, clean both the band slot and the connector bar with isopropyl alcohol. Buildup of lotion, sunscreen, or sweat residue can interfere with the locking mechanism. Regular cleaning prevents this problem from occurring.
Frequently Asked Questions
Can I use any Apple Watch band on any Apple Watch model?
Apple Watch bands are compatible within size groups. Bands for 38mm, 40mm, and 41mm cases work together. Bands for 42mm, 44mm, 45mm, 46mm, and 49mm cases are also interchangeable. You cannot mix bands between these two groups because the connector sizes are different.
Do I need any tools to replace my Apple Watch band?
No. The Apple Watch band system requires no tools at all. You press the release button with your finger and slide the band out. The new band slides in until it clicks. The entire process takes less than 30 seconds.
Why is my Apple Watch band stuck and not sliding out?
A stuck band is usually caused by dirt, sweat, or debris in the band slot. Apply isopropyl alcohol with a cotton swab around the release button. Wait a few minutes, then press the button and gently rock the band side to side while sliding it out.
How do I know which size Apple Watch band to buy?
Check the case size of your Apple Watch in the Settings app under General and then About. Match your case size to the correct band size group. If your case is 38mm, 40mm, or 41mm, buy bands from the small group. If your case is 42mm, 44mm, 45mm, 46mm, or 49mm, buy from the large group.
How often should I replace my Apple Watch band?
Most bands last between one and three years with regular use. Replace your band when you see cracking, fraying, discoloration, or when the connector no longer clicks securely. If the band causes skin irritation, switch to a different material sooner.
Are third party Apple Watch bands safe to use?
Yes. Third party bands use the same connector system as official Apple bands. However, quality varies between manufacturers. Look for bands with stainless steel connectors and positive user reviews to ensure a secure fit and good durability.

Hi, I’m Lucy Jones, a dedicated watch enthusiast and reviewer. I spend my time hunting down, testing, and evaluating the most intriguing wristwatches on the market. My goal is to guide you through the overwhelming choices with honest, hands-on insights into every timepiece.