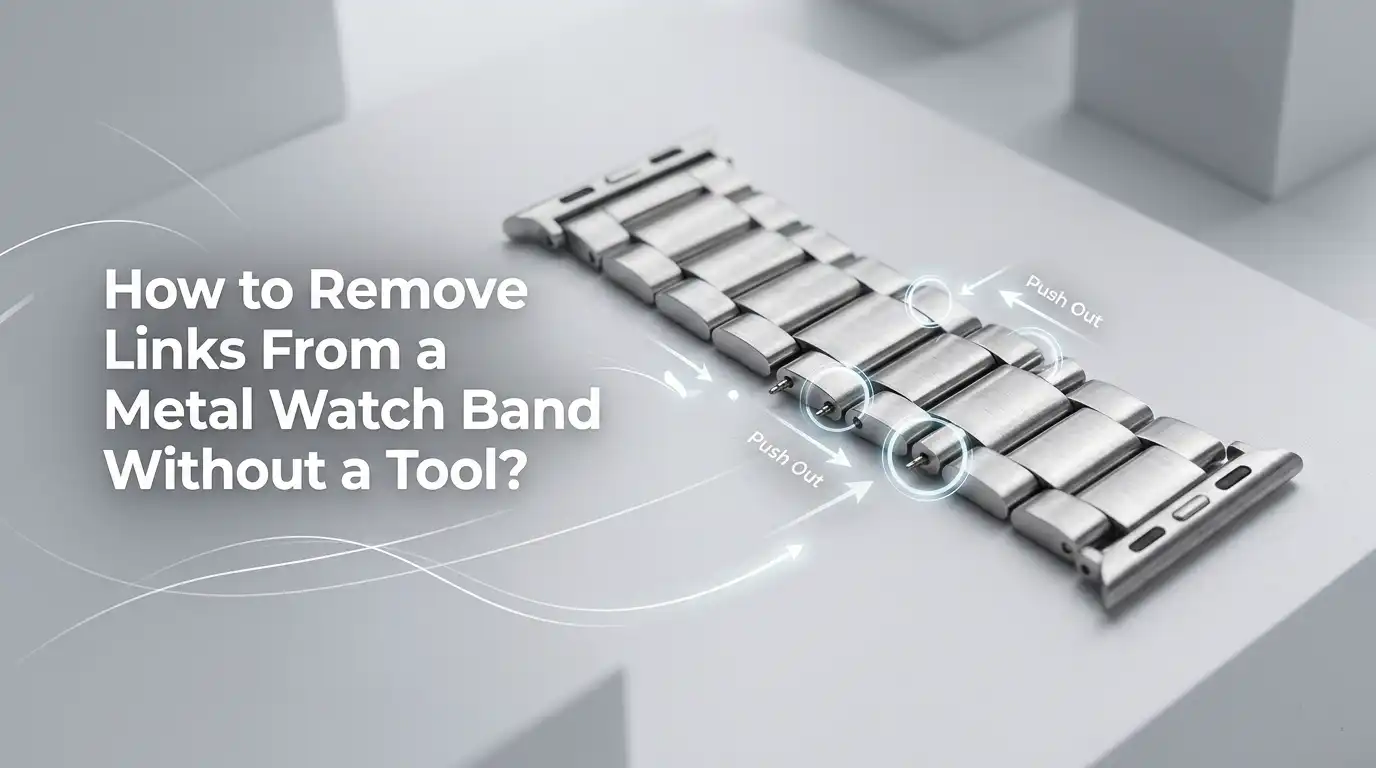
How to Remove Links From a Metal Watch Band Without a Tool?
A metal watch band should feel secure, light, and easy on your wrist. If it slides too far, bumps your hand, or twists around, the fit is off. The good news is that you can often fix this at home with a few common items.
You do not always need a watch kit, and you do not always need a trip to a jeweler. You just need to know what type of bracelet you have, which direction the pins move, and how to work slowly.
This guide shows you clear home methods that help you remove links from a metal watch band without a tool, while lowering the risk of scratches, bent pins, and lost parts.
Key Takeaways
- Start by checking the bracelet type. Most metal watch bands use pins, screws, folded links, or a pin and collar setup. You need the right method for the right bracelet. If you push a screw like a pin, you can damage the link fast.
- Look at the back of the bracelet before you touch anything. Many pin style bracelets have small arrows. Those arrows show the direction the pin should come out. This one small check can save you a lot of stress.
- Remove links from both sides of the clasp if possible. This keeps the watch head centered on your wrist. A balanced fit feels better and looks better. If you remove all the links from one side, the clasp can sit in a strange spot.
- Use simple household items with care. A thumb tack, SIM ejector tool, small needle, soft cloth, tape, and a hard table can often do the job. The item matters less than the control you use. Slow pressure beats rough force every time.
- Expect tiny parts. Some bracelets use very small collars or split pins. These pieces can fall out fast and disappear faster. Work over a tray or towel so you can see every part and keep it safe.
- Finish with a fit check, not guesswork. After you rejoin the bracelet, wear the watch for a few minutes. Your skin changes size during the day, so the first fit should feel secure but not tight. A small amount of movement is normal. If your clasp has a small adjust setting, use that before removing another full link.
Know Your Bracelet Before You Start
The first step is simple. Turn the watch over and study the bracelet. You need to know how the links connect before you try to remove anything. Most metal watch bands use one of four systems. They are pin links, screw links, folded links, or pin and collar links.
Pin links often have small arrows on the back. Those arrows show the direction for pin removal. Screw links show a tiny screw head on the side. Folded links often look thinner and lighter. Pin and collar links look like plain pins, but they hide a tiny collar inside the center link.
Pros: This check helps you choose the safe method. It also lowers the chance of damage.
Cons: It takes a few extra minutes, and some bracelets are hard to identify at first glance.
If you are not sure, do not force anything. A wrong push can scratch the bracelet or bend the pin.
Set Up a Safe Work Area and Gather Household Items
You do not need a special bench. You do need a steady surface and good light. Lay a soft cloth or folded shirt on the table. This protects the watch from scratches and stops parts from bouncing away. If you have painter tape, put a little on the side of nearby links. That gives extra scratch protection.
Useful home items include a thumb tack, a SIM ejector pin, a small sewing needle, a soft cloth, tweezers, a small bowl, and a hard book or block for support. A pencil eraser can help hold a tiny pin. A phone flashlight can help you inspect arrows and collars.
Pros: Cheap and easy setup. Most people already have these items at home.
Cons: Household items can bend or slip. They are less stable than watch tools.
Your goal is control. Keep the bracelet flat. Keep your hands close to the table. Work slowly and keep every small part in one place.
Measure the Fit and Decide How Many Links to Remove
Before you remove a single link, test the fit on your wrist. Put the watch on and pinch the extra bracelet material near the clasp. This gives you a rough idea of how much length you need to remove. Count the loose links in that pinched section.
Try to remove links evenly from both sides of the clasp. This helps the watch case sit in the center of your wrist. In many cases, taking one link from each side works better than removing two from one side. If you need an odd number, remove one extra link from the lower side of the bracelet so the clasp sits more naturally.
Pros: Better comfort and better balance. You reduce the risk of a crooked fit.
Cons: It is still an estimate until you reattach the bracelet and try it on again.
Do not rush this part. Removing too many links creates more work, and adding them back can be annoying.
Method 1: Use a Push Pin or Thumb Tack on Pin Links
This is the most common home method. It works best on bracelets with standard push pins or split pins. Turn the watch over and find the arrows on the back of the links.
The pin should move in the same direction as the arrow. Place the bracelet on a hard surface with a small gap below the pin exit side. The edge of a table, two stacked books, or a block with space under the pin can help.
Press the thumb tack or push pin into the pin opening. Start with firm hand pressure. If the pin begins to move, pull it out with your fingers or tweezers. Remove the second pin for the same link, then take out the link.
Pros: Fast, cheap, and simple. Great for common pin style bands.
Cons: The tack can bend. Tight pins may not move. Slips can scratch the bracelet.
If the pin does not move with steady pressure, stop and change method. Force is where mistakes begin.
Method 2: Use a SIM Ejector Tool for Better Control
A SIM ejector tool can work better than a thumb tack because it is firmer and easier to grip. This method is good for pin style bracelets with a visible opening on the back.
First, wrap the nearby metal with a little tape if you want extra scratch protection. Then line up the SIM ejector tip with the pin hole and press in the arrow direction.
If the pin starts moving, great. Pull it out with your fingers or tweezers. If it only moves a little, keep the bracelet supported and press again. Some people find that pressing the bracelet against the edge of a solid table gives better control than holding it in the air.
Pros: Better grip than a soft tack. It often gives cleaner pressure.
Cons: It can still bend on very tight links. It does not work for screw links.
Use calm pressure. If the tool starts to flex, stop right away and reassess the bracelet type.
Method 3: Use a Small Needle and a Firm Surface for Stubborn Pins
Some watch pins are tight but still removable at home. In that case, a small sewing needle or thin metal pin can help. The key is support. Never push a stubborn pin while the bracelet hangs loose in your hand. Place the bracelet on a firm surface with a small gap so the pin has somewhere to go.
Line up the needle with the pin opening. Press down slowly. If the pin begins to move, keep steady pressure until enough of the pin sticks out to grab it. Use tweezers or your nails to pull it free. Remove the matching pin on the other side of the link if needed.
Pros: Useful for tighter pins and more precise than a tack in some cases.
Cons: A needle is sharp and easy to slip. It can mark the bracelet or poke your finger.
This method works best if your hands stay braced on the table the whole time.
Method 4: Use a Small Flat Screwdriver for Screw Links
Some metal watch bands do not use push pins at all. They use tiny screws. If you see a small screw head on the side of the link, stop using pins or needles. Use a very small flat screwdriver instead. In many homes, a small eyeglass screwdriver works.
Hold the bracelet flat on a cloth. Insert the screwdriver into the screw head and turn slowly. If the screw moves, keep turning until it comes free.
Remove the link, line up the bracelet again, and screw it back together. Some bracelets have screws on one side only. Others may look like they do, but they still need support on the other side.
Pros: Clean method for screw links. Very little force is needed.
Cons: Wrong size screwdrivers can strip the head. Tiny screws are easy to lose.
If the screw does not move with normal pressure, do not force it. A stripped screw creates a bigger problem fast.
How to Handle Pin and Collar Links Without Losing Tiny Parts
Pin and collar bracelets can frustrate first time users. They look similar to normal pin links, but they have a tiny collar inside the link. When you push the pin out, that small collar can fall out too. It is easy to miss. It is also easy to lose.
To work safely, place the bracelet over a cloth or shallow tray. Push the pin out in the correct direction. Watch closely for a tiny tube like piece near the center link. Set that part aside right away. After you remove the link, you need to keep the collar ready for reassembly. Without it, the bracelet will not lock together correctly.
Pros: You can still do this at home if you stay organized and patient.
Cons: This is the easiest system to lose parts from. Reassembly takes more attention.
If you hear a tiny tap on the table, stop and look. That little sound may be the collar falling out.
How to Remove Folded or U Shaped Links
Folded links are common on lighter or older style bracelets. They often use thin folded metal and a clip like or U shaped piece inside the link system. These bracelets can feel less solid during repair, so gentle handling matters even more. You may need to open a small folded tab or slide out the link piece instead of pushing a standard pin.
Look closely at the underside of the bracelet. If it seems like rolled metal with a visible folded edge, you may be dealing with this style. Use a small flat tool with very light pressure. Open only what you must. Remove the link, then fold the tab or piece back into place carefully.
Pros: Possible with home items and light hand pressure.
Cons: Easy to bend the metal and hard to make it look perfect again if you go too far.
If the bracelet feels thin and soft, treat it like delicate sheet metal, not a solid steel bracelet.
How to Put the Bracelet Back Together
After you remove the right links, line up the bracelet ends and reconnect them. For pin style bracelets, insert the pin in the opposite direction of the arrow.
That means the pin goes back in from the side opposite the removal direction. Push it in by hand first, then use steady pressure to seat it fully.
If your bracelet uses a pin and collar, place the collar in the correct link opening first. Then insert the pin from the other side. Keep the bracelet aligned while you press. For screw links, thread the screw back in carefully and tighten it until it feels secure.
Pros: Most bracelets go back together without much force if the links are lined up well.
Cons: Misalignment causes resistance. That can bend a pin or damage the screw head.
Never hammer or force a part that is not lining up. Realign first. Pressure should feel firm, not wild.
Final Fit Check and Small Clasp Adjustment
Once the bracelet is back together, put the watch on your wrist and wear it for a few minutes. Move your hand, bend your wrist, and let the watch settle.
A good fit should feel secure without pinching. The case should stay centered, and the bracelet should not slide too far down your hand.
If the bracelet still feels a little loose, check the clasp. Some clasps have a small adjustment position that lets you fine tune the fit without removing another full link. This can make a big difference, especially on warm days when your wrist expands a bit.
Pros: Helps you avoid removing too many links. Small clasp changes are often enough.
Cons: Not every clasp has this feature. Some are stiff and hard to move without a small tool.
Do this check before removing more links. One tiny clasp move can save you from extra work.
Common Mistakes and How to Avoid Damage
The biggest mistake is using the wrong method for the bracelet type. Pins, screws, folded links, and pin and collar systems all behave differently. Another common mistake is pushing a pin in the wrong direction. If the bracelet has arrows, follow them. If it has screws, do not push at all.
People also damage bracelets by working too fast, holding the watch in the air, or skipping scratch protection. Lost parts are another common issue. Tiny pins and collars can vanish in seconds. Keep a tray, bowl, or cloth under your work area at all times.
Pros of a careful approach: Less damage, better fit, fewer repeat attempts.
Cons of rushing: Scratches, bent pins, stripped screws, and a lopsided clasp.
If you feel frustrated, stop for a minute. Most watch damage happens right after impatience shows up.
When You Should Stop and Let a Professional Handle It
Home methods work well for many basic stainless steel bracelets. Still, some watches need expert care. Stop if the bracelet is made from ceramic, gold tone coated metal, or very thin folded metal that bends easily.
Stop if the pin will not move after careful pressure. Stop if a screw head begins to strip. Stop if you lose a collar and cannot identify where it goes.
A professional is also the safer choice for expensive watches, vintage watches, or bracelets with unusual construction. The cost of a simple adjustment is often much lower than the cost of fixing damage.
Pros of getting help: Lower risk for valuable or difficult bracelets.
Cons: It costs time and money.
If the watch matters a lot to you, caution is the smart move.
FAQs
Can I really remove watch links without a watch tool?
Yes, in many cases you can. A thumb tack, SIM ejector tool, small needle, or tiny flat screwdriver can work if the bracelet is simple and you use the correct method. The key is bracelet type. Pin links respond to pressure. Screw links need a screwdriver. Do not mix the methods.
Which side do I push the pin from?
Look for arrows on the back of the bracelet. Those arrows usually show the direction the pin should come out. If there are no arrows, inspect both ends closely. One side may look slightly different. If you are unsure, stop and study the link before you apply force. Guessing is how scratches happen.
How many links should I remove?
Start small. Remove one link from each side if the bracelet is only a bit loose. If the fit is far off, test the watch on your wrist and pinch the extra bracelet to estimate the number. Keep the clasp centered as much as possible. Then do a final fit check before removing more.
What if the pin starts moving but will not come all the way out?
That is common. Once enough of the pin sticks out, use tweezers or your fingers to pull it gently. Keep the bracelet supported on a cloth or hard surface. If the pin feels stuck, do not twist hard. Realign the bracelet and try again with steady pressure.
Why does my bracelet feel loose even after I removed links?
The clasp may have a small adjustment setting that still needs to be changed. Your wrist size also changes during the day because of heat and activity. Aim for secure, not tight. A little movement is normal. If the watch twists around your wrist, you may still need one more small adjustment.

Hi, I’m Lucy Jones, a dedicated watch enthusiast and reviewer. I spend my time hunting down, testing, and evaluating the most intriguing wristwatches on the market. My goal is to guide you through the overwhelming choices with honest, hands-on insights into every timepiece.